 Sculpting your own miniatures can be a very rewarding experience.
It can also be very frustrating. This page is not intended to be
a how to sculpt page. I have merely included it to give you some
inspiration. There are many good sculpting pages out of the net.
I hope to have some links to them up soon. This is only a bare bones
sculpting tutorial. I studied sculpting at University for a while
so don't expect to pick it up quickly if you are not artistically inclined.
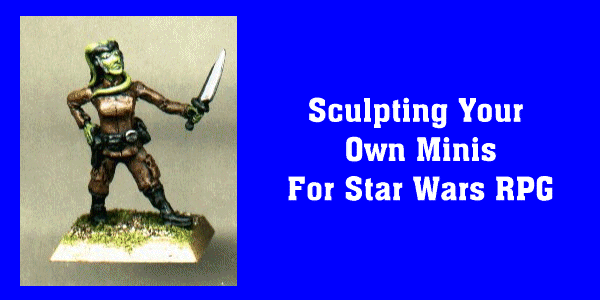
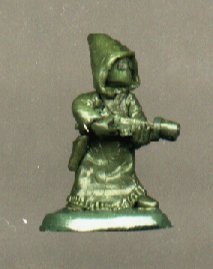
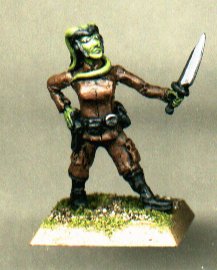
That said I don't want to brag. These Star Wars minis shown below
are some of the first minis I ever sculpted. Since I sculpted them,
I have not had a chance to sculpt Star Wars minis for quite a while.
I now do my own weapons where as most of these I used weapons from other
minis. I am not an expert sculptor by a long shot and even though
I have done a couple minis for pay I don't consider myself a professional
sculptor. I am quite amateur and sculpting at this small scale is
very challenging. You should look in the conversion section for my
tips on tools and epoxy putty.
Sculpting your own miniatures can be a very rewarding experience.
It can also be very frustrating. This page is not intended to be
a how to sculpt page. I have merely included it to give you some
inspiration. There are many good sculpting pages out of the net.
I hope to have some links to them up soon. This is only a bare bones
sculpting tutorial. I studied sculpting at University for a while
so don't expect to pick it up quickly if you are not artistically inclined.
That said I don't want to brag. These Star Wars minis shown below
are some of the first minis I ever sculpted. Since I sculpted them,
I have not had a chance to sculpt Star Wars minis for quite a while.
I now do my own weapons where as most of these I used weapons from other
minis. I am not an expert sculptor by a long shot and even though
I have done a couple minis for pay I don't consider myself a professional
sculptor. I am quite amateur and sculpting at this small scale is
very challenging. You should look in the conversion section for my
tips on tools and epoxy putty.
To sculpt you need a cork, some copper wire, some sculpting epoxy
putty, and some tools. I use dental tools for sculpting wax I got
at school. That's all you really need to get going. You can
get sculpting tools from many hobby stores and some miniature companies
like Games Workshop.
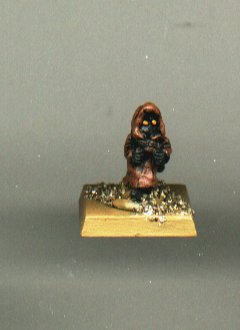
If you want to try a simple sculpt for Star Wars the easiest
I can suggest is a Jawa. I've done about three of them. Every
now and again I do one just to see how much better I can get it than the
last one.
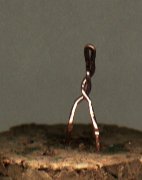
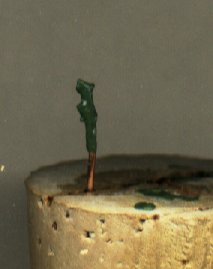
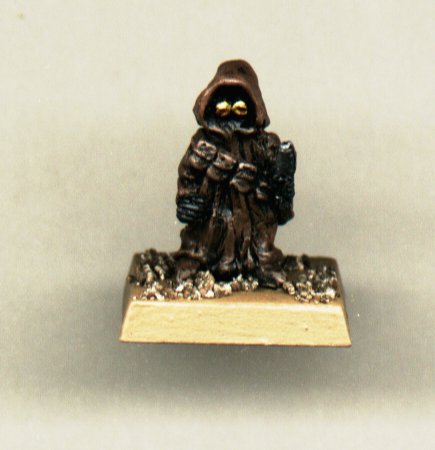
Step one: The armature.
I use copper wire for my armatures. It's a pretty simple
armature especially for a Jawa. You want to cut a bit of wire then
twist it together to form a ruff head and spine of the armature.
Then you bend the legs out into an upside down U-shape. You want
to leave a lot of wire at the bottom of the legs so you can sink it into
the cork base with glue. I use corks that have about a one inch bottom
on them. The cork gives you something to hold on to while you sculpt.
You want to set the miniature into the small end of the cork so when you
set it down it will be less likely to fall over. I get my corks from
a local hardware store. Most hardware stores have them.
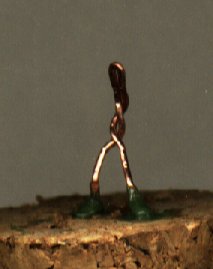
 Step Two: The feet.
I sculpt the feet on first to help anchor the armature to the cork.
Also, most people sculpt feet first. You sculpt from the base up
for the most part. Feet then legs, then body, then head, then arms.
For Jawa the feet are quite simple and they just peek out from under the
robe so you need not get really fussy with them. Jawa seem to have
simple leather shoes or foot wraps so you just need something basically
foot shaped.
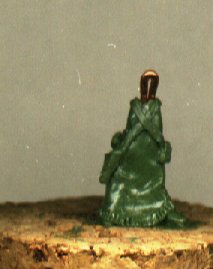
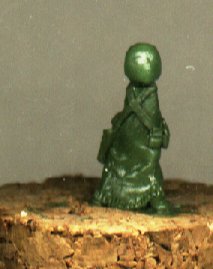
Step Three: The body.
The body is fairly simple. It's just a simple robe.
You should consider that there is a body under the robe while sculpting
it so it will have some bulk. It's a fairly simple shape. The
only detail I added here was the rough hem at the bottom of the robe which
I created just by dragging a tool through the soft putty.
 Step four: The body detail.
Next I added some of the detail to the body. The belts
are made from rolled snakes of putty. Just like you use to do with
Play Dough in grade school. When I get them rolled out I drape them
carefully around the miniature. Then I use a tool to flatten them
out into belts. It's tricky and does not always work but it's the
only way I have been able to get belts to come out at all. The holster
and pouches are made from balls of putty than I worked into shape after
sticking them to the miniature.
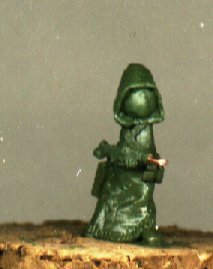
 Step five: The Weapon.
Weapons are hard. They just take a lot of practice.
This one was fairly simple. I based it off the Ion gun that the Jawas
use to fry R2-D2. I did it separate from the rest of the miniature
on its own cork because that is the only real way to do weapons practically.
I did not do the end of the barrel at this point because it would have
been difficult.
 Step six: The Head.
The head is basically just a ball of putty. Try and smooth
out the face area and keep it a bit flat. My Jawa is slightly stylized
so my face is not completely flat but if you want it to look just like
the movies you should keep it flat.
 Step seven: The Hood.
For the hood I just took a bit of putty then flattened it out
a bit. I then draped it over the head and formed the folds and peak
at the top of the hood.
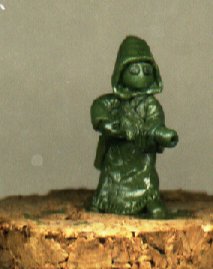
Step eight: The Arms.
The arms are a simple bit. Just roll out some short tubes
of putty then stick them on the body at the shoulders. Bend into
position then shape them with some fabric folds and such. Try and
be careful not to make them too flat or too round.
 Step nine: The hands and final details.
Next are the hands. An easy way to do hands is to make
mittens out of the putty then cut and shape the fingers in with a knife
or tool. It takes some practice to get just the right shape and it
is very hard to do hands in an open position. At this stage I also
added the end of the gun barrel and the eyes.
Step ten: The base.
The base is optional. If you are sculpting just to paint
them up you do not need to sculpt a base because you can just mount the
mini on a pre-made base. I wanted to do one on this Jawa just for
the heck of it. To make the base you need to pull the Jawa out of
the cork after all the putty is set. The best way to do this is to
cut around the feet and gently pry the mini up with a knife. Then
you cut the copper wire coming out of the bottom of the feet off to just
short nubs. I make simple based on the back of a ceramic plate with
an oval of putty. Then I stick the mini onto the base and try and
work the putty around the feet. Then I smooth out the base and let
it cure.
That's all there is to it.
Sculpting miniatures is a slow series of processes. You must
visualize the process of the miniature from the ground up. Even something
as simple as a Jawa take some serious pre-visualization. Between
every step you have to wait for the putty to cure which can take up to
two or more hours. Sometimes it will seem like too much time and
some times it will seem like not enough time depending on what you are
working on at the time. One way to speed up the process is to place
the un-cured mini in a coffee can or something similar under a desk lamp
or a swing arm lamp with a 75 watt bulb. This is a tricky solution.
You should only leave the mini under the lamp for 10 minutes at a time
then check to see if it has set up. You will need to let the mini
cool before you check it because the hot putty may seem soft until it cools.
If you leave them under the heat too long, you can fry the putty.
Also sometimes I put a miniature under the heat for only ten minutes but
it still blisters the putty. I'm not sure why but I think you should
always let the putty set up a bit before you put it under the heat.
Usually this time is taken up while sculpting the bit in question but from
time to time you may have a small detail or a simple part that needs to
cure before you can go on with the sculpt that only takes a short bit to
do. If the putty is too freshly mixed, it seems to increase the chance
that it will blister so you will need to check it every couple of minutes
and let it cool a bit rather than trying to cure it all in one go.
Always be careful when you put the mini under the heat. I have ruined
nearly finished minis by placing them under the lamp then forgetting that
they are there. You make think you can check your e-mail while the
putty is curing but it is easy to loose track of time and ruin the mini.
You will know the mini is frying because you will smell it while you are
trying to read your e-mail. Never leave the mini un-attended under
the lamp. I've never heard of any problems but it could be a fire
hazard.
Anyway now go out and get some putty and tools and give it a go.
Don't say I didn't warn you. Sculpting minis makes painting them
look like childs play.
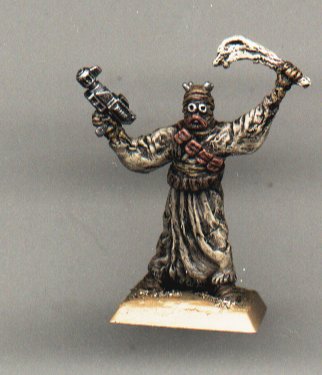
Below are a couple pics of minis I have sculpted for Star Wars.
 Return to Star Wars Adventrues in Miniature